I've been asked a few times now where I get my fats. I use many different kinds, primarily saturated animal fats, since those are the best for your body and best for cooking, but I try to use a variety and am learning to include coconut oil in my diet more. If you still think saturated fats will increase your waistline, I encourage you to read the book "Eat Fat, Lose Fat." and read what the Weston A. Price foundation says about fats. Fats are essential for energy, digesting, satiety, and lower the glycemic index of foods. They make up every cell of your body, so why not make sure you body is made up of good, strong fats? Here is a list of the fats I use, where I get them, and what they work best for.
Bacon fat
I save every last drop of drippings when I make bacon. I usually cook up about a lb of nitrate free farm fresh bacon each month, and the drippings are usually enough for the month. Try to find a pig source where the pigs are farm raised and pastured. Happy, well fed pigs make more nutritious (and better tasting!) meat.
Good for: sautéing veggies, meat, fish, flavoring veggies with bacon flavor.
Keep in fridge, fairly soft right out of fridge.
Lard
I don't have any lard at the moment, but will have some soon! My mom and I will be distilling some lard from pork fat that we are buying from a local farmer. You only need to simmer it in water all day, and then strain out the rich fat and let it cool. Be careful purchasing lard already prepared, it is often hydrogenated to make it more shelf stable.
Good for: frying, baking, sautéing, etc. Nice neutral flavor and very heat stable. Also excellent to add to beans when mashing them.
Keep in fridge, soft after a few minutes in room temp.
Beef tallow
A lot like Lard, only from beef fat. It used to be the frying fat of choice at McDonalds before the whole "saturated fat is evil!" scam came about. I save the fat whenever I cook beef, the rind from steaks, the big chunks on roasts, or the drippings from ground beef (if there are any, grass fed is pretty lean.) Simmer in a pot of water for several hours, strain, and refrigerate, the fat will rise to the top and can be kept in the fridge.
Good for: adding to soups, baking with meat and vegetables, frying, gravy.
Keep in fridge, will be hard until closer to room temp.
Chicken fat
I usually don't have any of this in my fridge, as whatever fat sits on top of my chicken stock I use with my soups and drink with my broth. The fat helps you assimilate more of the minerals and nutrients in the stock - so why would I remove it? Well, sometimes there is a lot more fat than I need, and then I'll scoop it off the top when the stock & fat are cold, and store it in the fridge for future use.
Good for: adding to soups that need more fat and flavor, sautéing, adding to beans when mashing, flavoring potato-like dishes or chicken dishes that have little fat on their own.
Keep in fridge, softens when warmed.
Butter
Oh, how I love butter. When grains return to my diet I will be slathering my bread in butter. For now, I slather my eggs in butter (a wonderful combination for digestion.) I also try to add lots of butter (or another fat) to any vegetables I eat, since fats help you digest greens, and greens help you digest fats! I used to use generic store butter, and while that is certainly better than margarine, it is usually made from leftover whey and is very low in nutrients - that is why it is so pale. If I had access to as much cream as I wanted, I would certainly make my own butter. It is really easy, and you can even let the cream sit out for half a day so you can have cultured butter! For now, I found a source for grass fed cultured butter made from the cream, that is pasteurized (cooked) but is at least not ultra-pasteurized, and tastes wonderful. It is a rich yellow color and I find that I'm happy to use a lot less than store butter.
Good for: slathering on everything, baking, frying, etc.
Keep in fridge (or freezer if longer than a couple months), softens after a few minutes in room temp.
Forgot to mention ghee as well! - ghee is clarified butter and has virtually no milk proteins or sugars in it. Often people unable to tolerate dairy handle ghee just fine. You can make your own ghee fairly easily, but you can get excellent ghee from Pure Indian Foods.
Palm shortening/ Palm kernel oil
Mild neutral flavor, and very inexpensive. This is what I use now for pretty much all my baking when flavor is not needed (cookies and brownies are richer with butter, for sure.) I get it through Tropical Traditions (when they have their half-price or free shipping sales) and it lasts me for a good half of the year. High in saturated fat so good for lots of uses and doesn't need to stay in the fridge.
Good for: pan frying, baking, etc.
Keep in cool cabinet, soft at room temp.
Coconut oil
I'm learning to use more of this in my dishes. Coconut is a natural detoxifier and has strong antifungal and antimicrobial properties, so I'm working my way gradually with it. It also adds a slight coconut flavor to certain dishes, which can be delicious if you like the coconut flavor. I don't personally, but I don't notice it in stir-fries or in flavorful dishes. A lot of people also use it for skin - from deodorant to natural sunscreen, I'm learning to do that as well. Be sure to find cold pressed and organic, this is often over-processed as well. Tropical Traditions carries good quality coconut oil for fairly inexpensive.
Good for: baking, any kind of frying, binding for granola, smoothies, skin.
Keep in cool cabinet, or fridge. Softens when heated, very hard below about 80º.
Olive Oil
I try to minimize cooking with this wonderful oil, is it is high in monounsaturated fats, which are very good in moderate amounts, but more easily damaged by cooking. I use it plenty in other dishes though. Be sure to buy cold pressed extra virgin. Be sure to test your bottle - it should turn completely solid after a couple days in the fridge, there are a lot of misslabeled bottles out there. It should be in a dark bottle and be richly colored and cloudy.
Good for: salad dressings, pesto & other sauces, some baking.
Keep in cabinet, use within two months of opening.
This mom also has good tips on cooking with fats.
Saturday, August 28, 2010
Friday, August 27, 2010
Lemon ice

Lemon Ice
4 egg yolks
juice of 1 large lemon or two small lemons
1/4 c honey
1/4 c coconut oil/butter/palm shortening
3 cups tangy yogurt
3 tbs honey
little vanilla
Mix up the first four ingredients, and put in double boiler (bowl on top of small pot with a little water in pot.) Whisk quickly while it thickens somewhat. Once it blends well and starts to bubble a little, it's done! Take it off, and allow it too cool.
Now, there are two ways to do this - you can freeze the yogurt and swirl in the lemon, or you can mix it all up and then freeze it. Personally, I like the lemon swirl, but it is up to your preference.
Mix the yogurt with the honey and little vanilla and pour into ice cream maker and freeze according to manufacturer's instructions. Once frozen to the point of soft serve, add lemon egg mixture and continue stirring and freezing. Transfer to freezer to firm up, and serve.
If you wanna be really fancy, pull out a (well-ripened for GAPS) banana and slice it up. Lemon and banana - yum!
Thursday, August 26, 2010
On the Menu
I haven't posted a menu in a little while - I know I find it helpful to look at other's weekly plans. Here is what we ate during this week. Lunch is leftovers or whatever I find in the fridge. Frozen yogurt or yogurt with banana makes a wonderful breakfast or snack!
Saturday
B- squash gratin
D- alfredo (thickened with bean paste) on salad & spaghetti squash
Sunday
B- bacon, egg crepes, yogurt
D - steak, mashed cauli-potatoes, salad with tomatoes and garlic dressing
Monday
B- egg drop soup
D- naked burritos
Tuesday
B-fried eggs
D- Chicken nuggets with sauteed summer squash
Wednesday
B- soft fried egg with lots of butter
D- Pesto on spaghetti squash with fresh tomatoes and romano
Thursday
B- rest of squash gratin
D- Sweet & sour lentils
Friday
D- Southwest salmon with grilled bell peppers
Saturday
D- Peanut chicken
Saturday
B- squash gratin
D- alfredo (thickened with bean paste) on salad & spaghetti squash
Sunday
B- bacon, egg crepes, yogurt
D - steak, mashed cauli-potatoes, salad with tomatoes and garlic dressing
Monday
B- egg drop soup
D- naked burritos
Tuesday
B-fried eggs
D- Chicken nuggets with sauteed summer squash
Wednesday
B- soft fried egg with lots of butter
D- Pesto on spaghetti squash with fresh tomatoes and romano
Thursday
B- rest of squash gratin
D- Sweet & sour lentils
Friday
D- Southwest salmon with grilled bell peppers
Saturday
D- Peanut chicken
Tuesday, August 24, 2010
Crispy Kale

1 bunch kale
olive oil or coconut oil
tsp (or so) salt
other seasonings, as desired
Turn on oven to 350º. Wash and cut kale into bite sized pieces, discarding hard stem. Melt coconut oil, if using (better for high temps than olive) and toss kale pieces in oil. Toss with salt and other seasonings - I used garlic along with another house blend I have - you can really do anything you want! Spread on pan or stone in a single layer and bake for 10-15 minutes, turning once or twice. Once cool, you can store in a paper bag to keep them fresh and crispy. If they last long enough to be stored that is.
I recommend doubling or tripling this recipe... I think my husband I finished these before they finished cooling. :)
Monday, August 23, 2010
Pasta pasta!

What to do when you can still make your favorite tomato sauce that is GAPS legal, or learned how to thicken gravy with a little yogurt, or just miss pasta because it sounds so exciting?
Here are a few different pasta methods:
Vegetable pasta
Veggies that work best include:
- Carrots
- summer squash (zucchini, yellow squash, pattypan)
- kohlrabi, beets
- cauliflower
- spaghetti squash
- winter squash
- grate
- process into tiny bits for "cous cous"
- sliver or chop into shreds
- run through a thin french fry cutter
- spiralizer
- or peel into strips with a vegetable peeler (as pictured)
- soak 1 hr in salted ice water (best for summer squash, carrots)
- drop in boiling salted water (sum squash only needs a minute - Just cook till color changes.)
- steam
- use raw
- spaghetti squash should be baked for an hour, then you scrape out the "pasta" shreds
- winter squash can be eaten raw, but will benefit from baking or boiling - you want it a little underdone for pasta
Make super thin crepes with 1 tbsp water per egg, 2 eggs per person. Slice into wide long noodles after cooled somewhat. The trick to thin crepes in a greased, (but not over-greased) pan and a quick hand. Beat eggs with water and put in just enough to cover pan with a quick swishing around. Use med/low heat and flip carefully with a spatula. Don't worry if you utterly tear up the first few - theses are becoming pasta anyway. Make sure they cool flattened out, not folded, and cut after cooling.
Gnocci
see my recipe here.
Or just eat your sauce as a soup and skip the pasta :)
For those of you who can handle buckwheat (not GAPS legal, but technically a fruit, so some people can handle it when sprouted or soaked) this mom has details on how to make pasta with buckwheat flour.
Shared on Pennywise Platter Thursday.
Saturday, August 21, 2010
Pizza Egg

2-3 eggs (depending on size of your pan and how hungry you are)
1/6 c milk or yogurt
half a large tomato, thinly sliced
half a green pepper, chopped into strips or small pieces
1/4 small onion, already cooked or little dried onion
1/4 c pizza cheese
little salt
little oregano (be fairly generous)
other pizza seasonings or toppings you like
Grease skillet Preheat to a medium fire. In a bowl, mix eggs, milk or yogurt, seasonings. Add pepper, onion, other “toppings” and half the cheese. Pour into pan. and cover with lid. Cook until edges are done and nearly cooked through, 3-5 min. Using spatula (or fork if you’re talented) flip over omelet without breaking. Quickly top with sliced tomatoes so the whole top is covered, and replace lid. Cook for two more minutes, until tomatoes have softened slightly, and then, (this is the tricky part) flip whole thing onto plate, so the tomatoes are spread underneath the eggs. Push back underneath any tomatoes that decided to slide out. Top with rest of cheese, which should melt as egg cools.
In the picture I show this with mozzarella - my favorite cheese - which is not GAPS legal. For GAPS I have been doing this with cheddar or other cheeses. Keeping the tomatoes underneath the egg as you eat it helps keep them warm - and all the flavors make this really taste like pizza!
Alternatively, you could also make this as a crustless quiche - just chop the tomatoes up and mix them in with the other ingredients before baking.
Spagetti Squash Gratin

Ingredients:
3 cups cooked squash
6 eggs
1/4 c yogurt
4-5 green onions, chopped
1/2 tsp salt
dash pepper
cheddar and parmesan or romano cheese
other seasonings, such as paprika, garlic, thyme...
lightly grease the sides of an 8x8 pan, cover the bottom with shredded/mashed squash. It should be loose so as to let egg fill in spaces and hold the dish together. Sprinkle green onions (and any other veggie add-ins) on top of squash. Beat eggs, then add yogurt, salt, and seasonings. Pour on top of squash. Sprinkle top with cheese. I used cheddar and some stinky romano, which ended up tasting wonderful. If you have ham, bacon, sausage, etc. - they could be wonderful additions as well.
Bake at 400º for 30 to 35 minutes.
Allow to cool some before removing from pan, slice into sections, and enjoy!
The yogurt takes on a sweet flavor when baked, so keep that in mind - I really enjoyed having the squash, then sweet egg, then cheese flavors on top of each other. It reheats well and tastes good cold for a quick breakfast too!
Thursday, August 19, 2010
How to turn milk into yogurt goodness

So how do you make such a masterpiece?
The first step to find a good quality culture - I used to use just plain yogurt from the grocery (be sure it says "active cultures") and preferred Dannon brand. You can also get starters from Cultures for Health. They have both heirloom starters and one-time-use starters. Right now I'm using Custom Probiotics Yogurt Starter #1 (they have two different ones.) There are lots of options out there and it's worth trying a few and finding your favorite. You can save some yogurt from a previous batch of your own to use within a couple weeks, but just be aware that it must be "pure" (not raw milk yogurt) and overtime the strength of the culture may fade. I could go about 2 batches past the store starter. Freezing starter only seems to extend the life of the cultures a week or two.
The next step is to heat (or not heat) to prepare the milk for culturing. Milk heated to 180º F will be thicker in the final product, milk kept closer to raw (so only heated to 105º F or so) will have more complex probiotics and the benefits of being raw. This type of heating is *not* the same as pasteurizing, which is an intense method and quite destructive of the milk. If your milk comes to you pasteurized though, do heat to 180º before making into yogurt, as you are more likely to have undesirable cultures in the milk, and you don't want to promote those! I hate heating milk, but I think breaking down the proteins somewhat, especially in such a gentle way, helps make it more digestible too. My dear husband likes the flavor and thickness that way as well.
Before heating, make sure your tools are perfectly clean, sterile is ideal, but I don't stress it personally. I just pour my milk into a pot and use a thermometer to check. Once it hits 180º F, I turn the heat off and stir throughout the heating and cooling time. For a crockpot method, heat on low for about 2 hours.
After heating, cool to about 110º F before adding your cultures. Adding them when it is too hot will kill them. Yogurt cultures are finicky about temps. For store yogurt, add about 2 heaping Tbsps culture per half gallon of milk. For other starters, follow the included instructions. Mix very thoroughly. Avoid stirring with plastic, as plastic never truly comes clean and tends to harbor other bacteria.
Now here is the tricky part... how to keep it nice and cozy warm (and undisturbed!) for 24 hours. If you only want standard yogurt, 8 hours is fine, but for GAPS yogurt, it needs to go the full 24. This helps eliminate all of the lactose. Some yogurt makers have a lot of trouble staying warm long enough, though if you have one it is worth a try. Some people like the cooler method, or going in the crockpot, or a warm oven, but I have a dehydrator now and love it's consistent temp control! However you decide to tackle this, the temp needs to be about 95-110º F consistently for the whole duration, and sit in a spot where it won't be bumped or jostled during culturing.
For the crockpot - at least in summer - heating the milk for 2 hours on low, then turning off and adding cultures 2 hours later, and then sitting with lid on for the next day can work well... If you can find a warm spot in the house, put a towel over it (cultures don't like light) or a empty microwave that will keep the light on with the door cracked... use a spot like that. Check and see if it keeps the temp you need.
A heating pad inside an oven is another effective method, just check that your heating pad doesn't have an auto-matic shut off! The oven insulates, so when I did this I just had the yogurt on one rack and the heating pad on another.
For the cooler -hot water method, check out this link.
In the dehydrator, just put it in, and turn it on. It must be a dehydrator with temp control, such as an Excalibur. I got one for cheap on Ebay and love it.
Once it is finished culturing, stick it in the fridge. I find it does better if I don't stir until it has cooled. It has a smoother consistency. Some fancier-bloggers out there have experimented with adding gelatin or sweetening or other fun stuff, but I like to keep it simple.
Finally - just a quick note on containers. When I started, I was so super fancy, I just used a big ol' pyrex bowl. It was what I had and it worked. Later on I switched to Mason jars, and now I use Fidos. A sealed jar helps prevent other cultures that live in your house from entering in and taking over. Yogurt cultures are weaklings, I'm sorry to say. You have all kinds of yeast and other microbes hanging out in your house all the time, even if you don't have kombucha, kraut, carrot pickles, and a hundred other ferments bubbling away nearby, and if any of them pop in and start chewing on the milk sugars before the yogurt guys do, then all of a sudden you'll have yeasty milk instead of yogurt. Kefir is a much more robust culture (it is far far more complex) and is a lot less picky. So by fermenting in sealed jars (and burping them before going in the fridge) I can avoid yeast-yogurt that is only good for breadbaking. And it tastes better too! If you have an air-lock on your fancy jar and it fits in your fermenting hot spot, even better.
So there you are. You have conquered the mystery of yogurt making, and you can culture the world! Or at least your stomach.
Sweeten to taste if desired, strain for cream cheese, use to thicken sauces, as a base for smoothies, ranch dressing, or soak your skin in it. Yogurt is wonderfully useful.
Curious about other ways to make yogurt? Here are some other methods and tips:
Raw Yogurt - cooler method
Incubator method and oven & heating pad method
Another heating pad method for smaller batches
Coconut milk yogurt (I would recommend sweetening with honey, not agave though.)
Getting Whey & Cream Cheese - Video
Another cream cheese method from buttermilk
How do you like your yogurt?
Crackers and Dips

Spinach dip
2 packed and overflowing cups spinach
2/3 c cream cheese
2 cloves garlic (if you want it less strong you can cook it before hand)
1/2 onion, cooked
couple pinches salt
Parmesan would have been a good addition, I didn't have any available.
Put everything through food processor, then fridge for an hour or two till more firm.
French onion with (shhh!) liver
2 cloves garlic
1/2 onion, cooked
lots of parsley
1/8 c cooked chicken liver (cook with onions in bacon fat)
1/3 c cream cheese
pinch salt
Whirrr in food processor, fridge for an hour or two.
Tip: Cutting garlic a little bit before adding to processor helps to make sure there are no big chunks at the end.
For the crackers, check out this recipe by Grain Free Foodies. I used mostly sunflower seeds, and threw in some cashews because they were sitting there. I highly recommend using soaked and dehydrated seeds and nuts to make them more digestible. Also be sure to watch the crackers carefully - they go from "done" to "burned" very quickly. Once done, immediately cut and lift from pan. They can cool on the pan, but if you wait too long to loosen and cut... you'll end up with a lot more crumbs. (oops!)
Best Ever Grain Free Brownies!

(Note: Cocoa is technically not GAPS legal, but I'm allowing it to keep sane, and I don't think it hurts my progress too much. Everything else is GAPS legal.)
Ingredients:
1 c pecan butter (put crispy pecans in processor till they turn to butter.)
1/2 c overcooked, mashed butternut squash - could increase to 1 cup for more volume
4 eggs - increase for more cakey brownies
1 1/2 tsp vanilla extract (make sure no corn syrup or additives)
1/2 tsp salt
1 c cocoa
1/2 c palm shorting/ coconut oil/ butter (butter would give a richer flavor)
1/4 c honey & 1/8 tsp (scant!) stevia OR 1/2 c honey (taste to see if it needs more)
Soften your fat and add other wet ingredients. Mix everything aside from cocoa thoroughly and preheat oven to 350º. Fold cocoa in gently until completely mixed in, but do not overmix. Pour into well greased 8x8 or 9x9 pan and bake for 30 minutes. Wait until cool before cutting into, if you can manage!
These are rich, soft, and dense. I'd like to try using some unsweetened chocolate instead of the some of the cocoa. The conversion is 3 T. cocoa powder and 1 T. butter for 1 ounce of unsweetened baking chocolate, so I would use 3 oz. unsweetened chocolate and lessen the cocoa to 3/5 cup, and the fat to 1 heaping tablespoon.
Many thanks to all those who inspired me with their recipes!
Shared on Pennywise Platter Thursday 8/19.
Lamb Meatballs with Braised Cabbage

Then I looked at the recipe again and saw mint, cinnamon, and allspice and wondered if I should really try something Lebanese. So I skimped on the odd flavors and overdosed on garlic. Yum yum.
Lamb Meatballs with Braised Cabbage
(meatball recipe modified from this one for Lebanese Lamb Meatballs.)
Ingredients;
Meatballs:
1/4 c dried onion, or 1/4 finely chopped fresh onion
3 Tbsp parsley
2 Tbsp dried garlic, or 1 clove finely chopped
3 mint leaves, finely chopped
1/2 tsp cinnamon
sprinkle pepper
1 tsp salt
1 lb ground lamb
bacon fat or sausage fat for cooking
Cabbage:
1 head of cabbage
1/2 tsp cumin
1/2 tsp garlic powder
tsp italian seasoning blend
tsp salt
olive oil
Mix all ingredients for meatballs and shape into balls, and put in large skillet with a little fat so they don't stick. I had made sausage that morning, so the leftover drippings were a wonderful base to brown the meatballs in. Put the lid on and cook on medium/low heat.
Take off outer leaves and any browned parts on cabbage. Cut out core and put in pot with a couple inches of filtered water. Steam for about 7 minutes. Check on meatballs periodically and rotate them. When cabbage is looking clear, drain, rinse in cold water so you can handle it, and cut into smallish chunks. Return to pot and toss with olive oil and seasonings.
When meatballs are browned on all sides (Don't forget to rotate them!) remove from pan and set aside. Put cabbage in skillet that had meatballs (it probably won't fit very well, that is ok.) and cook on medium/high heat, turning frequently with tongs until browned.
Serve immediately.
Hubby and I really enjoyed, though I think I did more pepper than I should have (I lessened the amount for recipe.) It was fun to have a different flavor, and the cabbage took on some of the flavors from the meat nicely.
Tuesday, August 17, 2010
Week 12 - What GAPS has helped so far
Our vacation was great! I planned meals carefully and am glad that slightly spicey/flavorful dishes taste just as good cold as hot. We had a fridge/freezer and a stove, so we could do eggs in the morning and ate lots of salad and frozen yogurt with the heat. I also made awesome grain free brownies so we wouldn't be tempted by all the desserts. It was a good week.
Now that I'm back (and trying to post a backlog of recipes) I thought I would make a list of all the complaints that have gone away or improved since I started GAPS.
We'll be doing grain-free full time for another couple weeks, but after that we are going to bring back grains in smaller quantities than pre-GAPS, and make sure they are properly prepared by soaking, sprouting, fermenting. I can't wait to make some sourdough!
Now that I'm back (and trying to post a backlog of recipes) I thought I would make a list of all the complaints that have gone away or improved since I started GAPS.
- mental clarity
- no longer chronically cold, even in the summer - basil body temp much higher
- chemical sensitivity is much much less
- sensitivity to scents, strong flavors/odors
- sun headaches are gone
- sunburn less easily
- chronic nausea is gone and there are only a couple foods that cause very mild queasiness
- gas discomfort
- skin problems - acne is much improved, dandruff is gone
- no more severe symptoms when hungry
- blood sugar issues
- less sleep needed
- symptoms of thyroid problems
- hair fall out
- body odor
- confusing fertility signs completely cleared up
- lots of good fats - organic, grassfed butter, virgin coconut oil, palm oil, bacon fat, beef tallow, chicken fat, lard
- only buying grass-fed or pastured animal meats and eggs and following this guide for fish
- daily fermented cod liver oil
- daily sauerkraut
- daily probiotic
- daily stock
- raw milk, lots of homemade 24+ hour yogurt
- raw honey, stevia as sweeteners
- lots of fresh, cooked, fermented vegetables, buying organic where it counts.
- soaking and dehydrating nuts and seeds
- no grains - although I will be bringing back sprouted and fermented grains soon, since they do not seem to bother me.
We'll be doing grain-free full time for another couple weeks, but after that we are going to bring back grains in smaller quantities than pre-GAPS, and make sure they are properly prepared by soaking, sprouting, fermenting. I can't wait to make some sourdough!
Skillet Fish with Summer Medley

- 1 serving of fish for each person
- 1 small summer squash per person
- 1 or 2 small tomatoes per person
- (Other random veggies about to die if not consumed.)
- fresh basil, oregano, or parsley if available
- little bacon drippings or other fat
- salt to taste
- garlic, paprika, dill
While fish is defrosting, wash and slice thinly the summer squash or zucchini. That goes into the pan on medium heat along with the fat. Stir often while slicing tomatoes. When squash is starting to turn clear and get lightly browned, toss in tomatoes. Continue to move quickly, add more fat if needed, and season with a tsp or so of salt, and fresh spices. Basil is the best of course, either dried of fresh.
Once that is done transfer to a plate, add some more fat to the pan and put in the fish. Turn heat down a little bit. Season generously with garlic, paprika, and dill. Put a lid on and allow to cook for a few minutes, until fish starts to be flaky. You may need to rotate the fish depending on how evenly your pan heats, but their should be no need to flip the fish with the lid on.
Serve immediately and don't have leftovers. These don't reheat well, but taste amazing when first prepared!
Pineapple Vinegar - Making use of waste
When we had our barbecue, I got some fresh pineapple for munching, roasting, and salsa. Have you ever roasted pineapple over open flame? It's a lot healthier than roasting marshmallows! There were a lot of scraps leftover - and you can use them before they go in the compost!

If you haven't read Nourishing Traditions (where this recipe comes from) then this may seem like a foreign concept, and what do you do with pineapple vinegar anyway? Anywhere else you would use vinegar - but could use a pineapple zing!
Heres how:
Stuff the core, skin, and other pineapple trash into a quart sized mason jar. The scraps from one pineapple will easily fill two jars. Add a tablespoon of whey, 1 tsp dried oregano, and 1/8 tsp red pepper flakes to each jar. Fill the jar with filtered water and make sure everything is submerged, while still leaving an inch or more of air-space in the top of the jar. Seal tightly, and leave on the counter at room temp for 3 days.
When finished fermenting (there should be a nice "pop" and a vinegar smell when you open it.) Strain and throw the scraps in the compost, and store the vinegar in the fridge!
 I'm looking forward to using this next time I make stir-fry - I sometimes use pineapple juice as the liquid base for the sweet & sour, but I can use this instead!
This recipe is linked to the 6th edition of Simple Lives Thursday.

If you haven't read Nourishing Traditions (where this recipe comes from) then this may seem like a foreign concept, and what do you do with pineapple vinegar anyway? Anywhere else you would use vinegar - but could use a pineapple zing!
Heres how:
Stuff the core, skin, and other pineapple trash into a quart sized mason jar. The scraps from one pineapple will easily fill two jars. Add a tablespoon of whey, 1 tsp dried oregano, and 1/8 tsp red pepper flakes to each jar. Fill the jar with filtered water and make sure everything is submerged, while still leaving an inch or more of air-space in the top of the jar. Seal tightly, and leave on the counter at room temp for 3 days.
When finished fermenting (there should be a nice "pop" and a vinegar smell when you open it.) Strain and throw the scraps in the compost, and store the vinegar in the fridge!

This recipe is linked to the 6th edition of Simple Lives Thursday.
GAPS Granola

I combined ideas and came up with this recipe:
3 cups of stuff - soaked and dehydrated pumpkin seeds, flax seeds, slivered almonds, & sunflower seeds.
I processed about half of it so some could be a little more finely ground (and more surface area for honey!)
Add 2 heaping Tbsp coconut oil, and 1/4 c honey, melted. Mix thoroughly until evenly coated. It will be very sticky and require frequent finger licking.
At this point you can allow to cool and harden on it's own, or make it crisp in the oven. I think the philosophy of GAPS would prefer it un-baked. I baked at 350º for 25 minutes - stirring half-way through. Break off from the pan before it completely cools.
(I also recommend soaking everything for a long while in order to clean :)
I think it will keep at least a few weeks outside the fridge - especially if not baked. I wouldn't know as we ate all within the week - and had to force ourselves to not eat it all in a single sitting! My husband thinks it's candy.
You can also add a cup or more dried fruit, coconut, good chocolate chips, etc. to this recipe. Yum yum!
Making six eggs look like a lot - Fluffy Layered Frittata

Ingredients
6 large eggs
1/4 c milk (opt.)
1/4 c shredded cheddar
little bacon
little green onion or other add-ins
pinch salt
tsp vinegar (opt.)
Separate yolks from whites carefully. Make sure the bowl you put the whites in is perfectly clean, and not a speck (Not a speck!!) of yolk gets into the whites. I usually crack the egg in half and gently toss the yolk back and forth between the two shells to get out all the white. Turn the oven on to 350º. Beat the eggs yolks with the milk, if using, greens, some of the cheese, and any other add-ins. Grease thoroughly you 9x9 pan. I usually use butter for this, but any kind of good saturated fat will work.
Beat egg whites with clean beaters until stiff. Add salt and vinegar as you go along. The vinegar is not critical, but I think it is supposed to help it stay fluffier as it bakes. Once egg whites are stiff, pour the egg yolk mixture into the pan, followed by the egg whites. A spatula is helpful to spread them in the pan - keep in mind that the center will become taller as it cooks - if you want it more even, then make it slightly more shallow in the center. Top with the rest of the cheese and chopped up bacon bits.
Bake for around 40 minutes. I flipped upside down onto our plates, to emphasize the layered look, but, either way it will taste delicious!
Friday, August 6, 2010
Honey Ginger Carrots

Ingredients:
- enough carrots for everyone, either baby carrots, or larger carrots cut into smaller pieces.
- little butter
- little honey
- few pinches ginger
Steam the carrots for a few minutes until just soft, drain. Add rest of ingredients - to taste. You don't need much butter, honey, or ginger to give it a wonderful flavor. Yum!
(Could also substitute another fat instead of butter, such as bacon drippings or coconut, but butter tastes best in my opinion.)
Spicey Lentil Stew on Salad

Here is the recipe from Grain Free Foodies, my modified summer version below:
2 T butter or ghee or coconut oil
1 large onion, chopped
3 (or more!) cloves of garlic, finely chopped
2 heaping tsps of organic, non-irradiated curry powder
1/2 tsp paprika
2 cups of lentils, soaked for 24 hours and drained
2 cups of chopped greens, somewhat tightly packed
2 cups (or more) of meat stock
1 T apple cider vinegar or lemon juice
salt and pepper to taste
Two large tomatoes, chopped
1/2 lb sausage, cooked, crumbled
4 ribs celery, chopped
To sprout lentils, soak in water overnight, drain, and use a cheesecloth on a container or a sprouter to let extra liquid drip out and air to circulate so they can sprout for a day or two. Rinse twice a day. I sprouted mine for two days and decided the tails were plenty long.
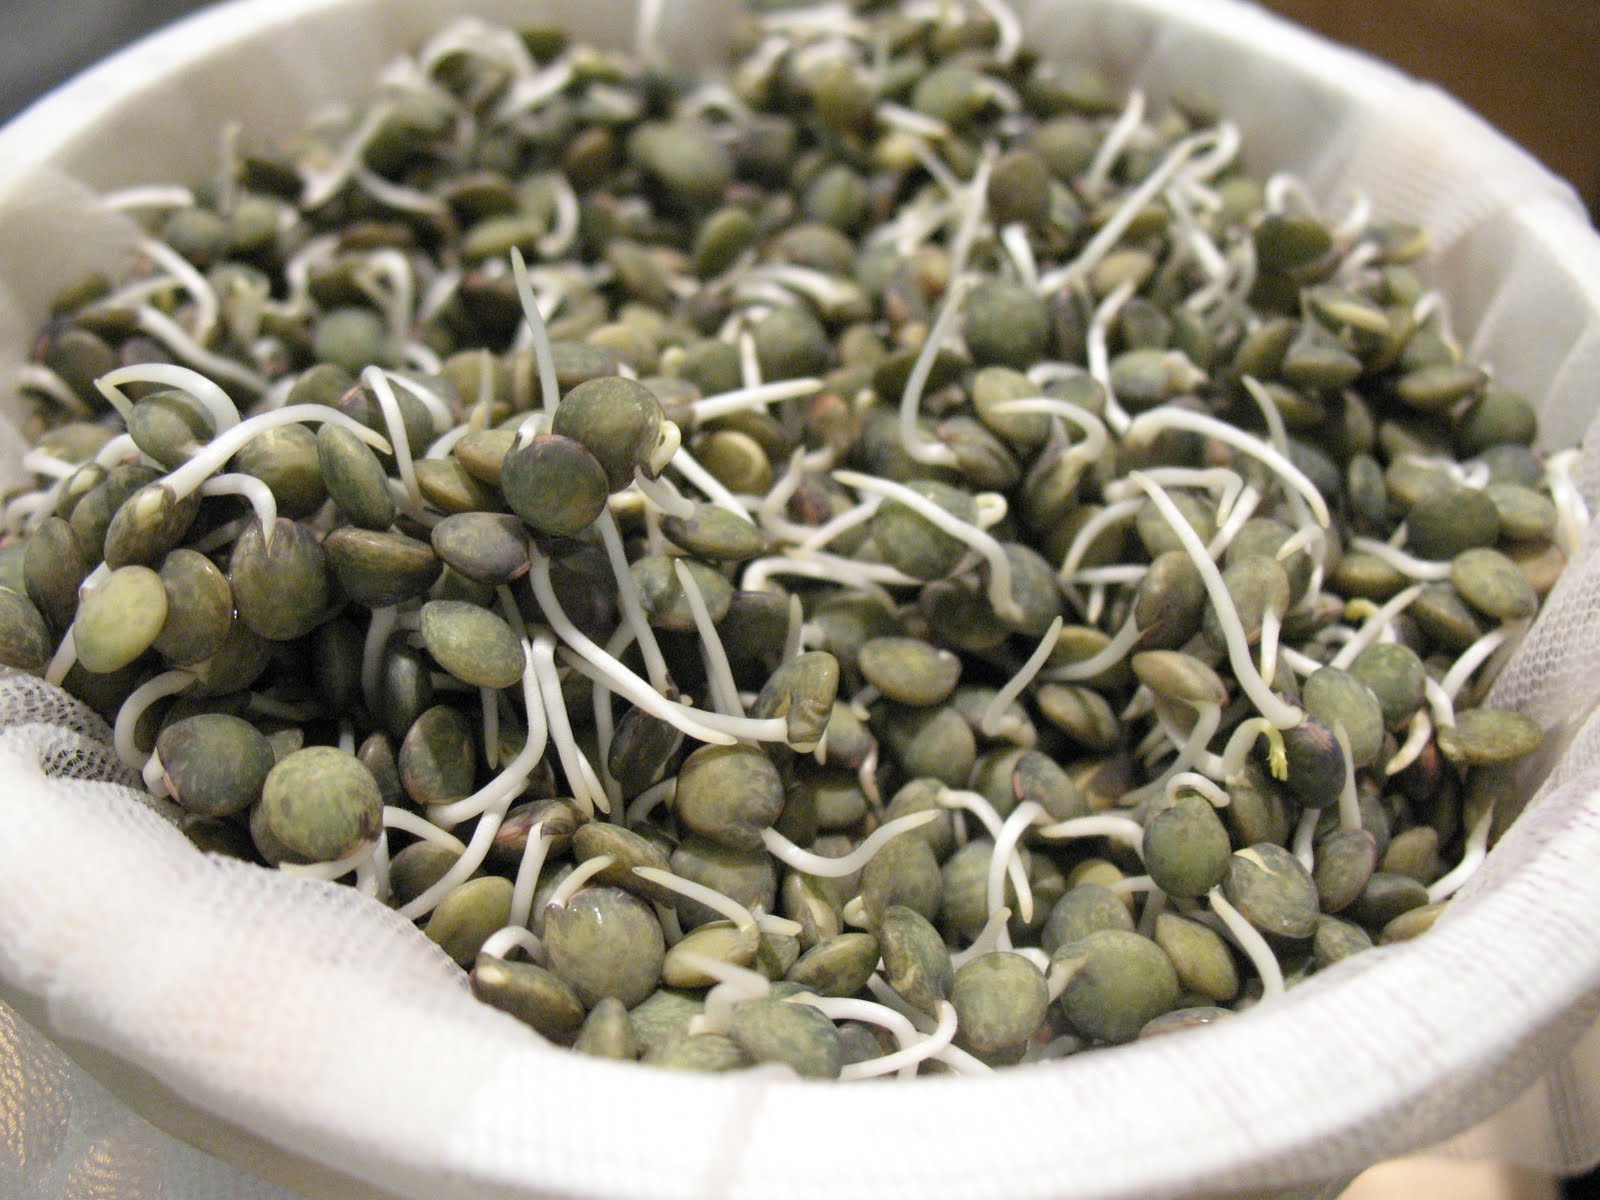
Saute onions in fat for several minutes until they become soft. Add the garlic, celery, salt and spices and continue to saute on moderate heat another 5 minutes or so.
Add the lentils and cook another few minutes. Add the stock, sausage, and tomatoes, and bring to a boil. Simmer until lentils are tender, 30-50 minutes depending on lentils.
If the stew is thicker when done than you want, add more stock and heat through. Remove from heat and add lemon juice or vinegar (real balsamic vinegar is the best if you can get it). Taste and adjust the seasonings.
Wash and shred your greens, top with stew mixture after cooling, or eat warm.
Week 10
This has been a busy week getting ready for our vacation. We are staying in a cabin with cooking privileges, fridge, etc. but I still want to have as many things pre-prepared as possible, and need lots of foods to eat cold while on the road. Lots of salad! I'll be posting our quick and packable recipes as much as I can. I'm also going to make some GAPS desserts so we are less tempted by the very poor quality food that I know will tempt us while we are there.
When I get back I plan to post on what conditions this diet change as helped, as well as how this is different from our "healthy" diet that we had before, and what changes I would still like to make if we can.
Meanwhile, my baby loves sauerkraut, plain home-made yogurt, avacado, and mashed navy beans! Now if I could only get her to not make a mountainous mess each time she eats....
Thursday, August 5, 2010
Preparing almonds & other nuts
Did you know you can make your nuts more digestible and gain valuable enzymes from them by how you prepare them?
Nuts have wonderful enzymes - the trick is making them available (by soaking) and then not destroying them (roasting at high temps). My oven only goes as low at about 170º - not low enough to maintain the enzymes (below 150º is best) and heats up the house besides. I don’t have a dehydrator right now (though I wouldn’t mind a nice Excalibur) but I certainly have plenty of summer heat, and a car.
First soak them for 7-24 hrs in salted filtered water. Use about 1 TBS sea salt per 4 cups of almonds. Soaking (and sprouting) also eliminates phytates that rob your body of minerals and nutrients. Drain, and spread in a single layer on a cookie sheet or stone. I like to add some additional salt at this point, just sprinkled on to taste. Then dry them. I have done them in the oven sometimes, but with the heat, I just put the pans on the dashboard in the morning where the sun would be shining in. When I went to take them out later that afternoon, I need hotpads! It took two days of sunshine to get them crispy, but then I can store them in the cabinet for a quick snack.
This past time, I peeled them. It isn't hard, and makes them a little easier to digest, and a little tastier and nicer when ground up for baked goods. Before drying them, right after draining, just squeeze the skins off. They will go flying, so have the other hand there to catch them while you squeeze with the other hand.
 What do you do with the skins? Well, you could add them to ice cream while you make it to add a touch of almond flavor,(just drain out before you freeze it), put in alcohol to make almond extract (let me know if you try this!), or just throw in your compost.
And other nuts? Do the same thing! Peeling is not necessary, but soaking and drying works the same way for most nuts. Cashews are a little different. They should only soak for 6 hours and be dried at 200º - 250º. They do not come to you truly "raw", because heat is required for removing them from their shells. For more info and ideas with nuts, check out Nourishing Traditions.
Nuts have wonderful enzymes - the trick is making them available (by soaking) and then not destroying them (roasting at high temps). My oven only goes as low at about 170º - not low enough to maintain the enzymes (below 150º is best) and heats up the house besides. I don’t have a dehydrator right now (though I wouldn’t mind a nice Excalibur) but I certainly have plenty of summer heat, and a car.
First soak them for 7-24 hrs in salted filtered water. Use about 1 TBS sea salt per 4 cups of almonds. Soaking (and sprouting) also eliminates phytates that rob your body of minerals and nutrients. Drain, and spread in a single layer on a cookie sheet or stone. I like to add some additional salt at this point, just sprinkled on to taste. Then dry them. I have done them in the oven sometimes, but with the heat, I just put the pans on the dashboard in the morning where the sun would be shining in. When I went to take them out later that afternoon, I need hotpads! It took two days of sunshine to get them crispy, but then I can store them in the cabinet for a quick snack.
This past time, I peeled them. It isn't hard, and makes them a little easier to digest, and a little tastier and nicer when ground up for baked goods. Before drying them, right after draining, just squeeze the skins off. They will go flying, so have the other hand there to catch them while you squeeze with the other hand.
 |
| Hold in your fingers like so. Then squeeze toward the smaller side of the nut. |

And other nuts? Do the same thing! Peeling is not necessary, but soaking and drying works the same way for most nuts. Cashews are a little different. They should only soak for 6 hours and be dried at 200º - 250º. They do not come to you truly "raw", because heat is required for removing them from their shells. For more info and ideas with nuts, check out Nourishing Traditions.
Sunday, August 1, 2010
Fluffy Wheat-less Pancakes

This recipe is a gift from Grain Free Foodie. I highly recommend the lemon honey syrup she mentions as well. I made a few modifications, so I list her recipe with my changes here:
Ingredients:
1 C pureed, cooked squash
1/2 C peanut butter
1/2 C almond flour
5 eggs
1/2 tsp salt
pinch stevia
Method:
Separate the eggs, and beat the whites until fluffy (soft peaks are fine). In a large bowl, mix together the 5 egg yolks, the squash, the nut butter, and the salt and sweetening. Blend thoroughly. Fold the egg whites into this mixture gently, so that the resulting batter is airy and light.
Cook on a well-greased griddle on a somewhat low heat, (medium to low) as they do burn easily. Flip them gently as they do not stay together as well as regular pancakes.
 |
| Spread them on the pan with a spatula. |

Thanks Grain Free Foodie!
Honey Pineapple Shrimp & Red Cauliflower (Sweet & Spicey goodness!)

Honey Pineapple Shrimp
(from Better Homes and Gardens)
- 1-1/2 lbs shrimp
- 1 lime
- 1 garlic clove
- 1/2 c fresh cilantro (can sub parsley) chopped
- 1 tbsp olive oil
- 1 tbsp honey
- 20 oz peeled pineapple
- 1 red onion
- 1/8 tsp salt
Finely chop garlic, cilantro, and pineapple, and chop onion. Grill onion, pineapple, shrimp - basting with some of sauce made from other ingredients and pineapple juice, reserving extra sauce for after cooking. Or just pan fry everything, cooking onions and garlic first, then adding shrimp to cook until just pink on one side, then adding the rest of ingredients and cooking for another couple minutes.
This recipe is very flexible - I like more greenery and not quite as much pineapple, just use whatever you have.
For red cauliflower recipe, see Food with Kid Appeal's post. I cut the cauliflower into smaller peices than she shows in the picture, but still had decent sized chunks. I also used a little less lemon and a little too much cumin. Yum!
 Note on the shrimp: I got whole raw wild shrimp. (See photo) It was kinda creepy to cut the heads off, and a little more work to peel and de-vein, but the resulting taste and texture was well worth it. I'd previously always gotten the pre-cooked and de-veined shrimp that was really easy to peel, but the flavor and texture was nothing like these. The meat was more flaky and lingered in your mouth so much longer. I will definitely be buying these again even if they are looking at me!
Subscribe to:
Posts (Atom)


