Showing posts with label Dessert. Show all posts

Friday, January 30, 2015

Super-rich Chocolate Mousse

This is not for the faint of rich desserts. In fact, you probably don't want to make this unless your body is ready for intense fat in every single bite. Mmm... I make this when I'm hungry all the time and can't seem to eat enough. I like it a little better than the "fat-bomb" recipes I've seen floating around. And this is fancy schmancy enough to share with guests. In small dishes. With fruit. And whip cream to make it lighter. It is intense.

Are you ready for this kind of mouth-watering goodness? Here's you go....

Ingredients:
2 oz choc (unsweetened)
(can increase to 4 oz choc, and increase butter slightly and double sweeteners)
1 stick butter (1/4 lb)
4 eggs separated (from a trusted source, as these stay raw!)
1 T vanilla
1/16th tsp stevia powder - or just more honey
1/4 c honey (4 T)
2 pinches salt, maybe a bit more if you like salty chocolate
1 TBSP gelatin

Melt chocolate over double boiler. (If you don't have a double boiler, just check this post.)
Add softened butter, or melt slightly with chocolate. Gently combine. Be careful of anything cold hitting hot melted chocolate.
Add salt. Add sweetening (being careful to not add cold liquids to hot chocolate).
 Taste and see if sweetened to your liking. You probably will want to double or triple the sweetening I suggested.
Remove from heat and allow to cool some.
Beat egg whites in a separate bowl until soft, but not quite firm peaks form.
When chocolate cool enough to touch with your finger, add yolks and gently fold in. Add vanilla.
 Sprinkle gelatin into mixture mixing well so no clumps form. If chocolate has cooled too much, gelatin won't mix well, jut return to warmth for a minute or two.
Dump egg whites into chocolate mixture and fold gently until mostly incorporated. Transfer to fridge, checking occasionally to fold together more.

Can transfer to individual dishes while still soft, or simply cool in bowl till firm. 

Garnish with berries, cocoa nibs or whip cream if desired. Pretend you are french while eating and love fat.


Thursday, February 27, 2014

Instant Icing! 1 tool, 1 dish, 3 ingredients. Mmmm... butter-fudge.


Not long ago I found myself stuck - I needed to consume more butter, more egg yolks, and wanted something snacky. You know, for when you wander in the kitchen for the hundreth time and don't really need a meal yet, but just want to nibble a little bit. You stare into the mounds of leftovers in the fridge and come to the conclusion that there is certainly nothing to eat. So you'll just have a few spoonfuls of fudge and try again later.

Jello has been our mainstay of healthy-yet-snacky stomach stabilization, and now this convenient fudge recipe has become our second fix.

And this is the best part - you only need to dirty one dish and one utensil. Really? Fudge and no dishes? Why thank you.

Ingredients:
1 stick of butter (if unsalted, a little salt brings out the sweetness, salted tastes fine too)
1-2 egg yolks (can include egg white if desired, but there is no cooking involved)
a tsp or so of honey.

And here is the trick:

In a small glass dish (such as those 2 cups bowls you didn't have a use for?) warm your butter to just above room temp - I put my toaster oven on a low temp and soften the butter that way - you don't want it melted, but you also don't want it too firm. Probably in the summer, room temp will be plenty soft.

Then add your egg yolks and honey.

And whip! I usually use a butter knife, since it does cut the butter off my tray easier, but both a spoon and a fork work too. Just keep whipping it. You want to get air into it, and emulsify the egg yolk. It will look like it's not working for a little while, and then all of a sudden it becomes smooth and soft.

And now lick a little bit. Mmmm, icing. You have now made buttercream icing, and it was easy peasy. And yes, it is quite yellow - yellow yolks and yellow butter!

I sometimes dress this up with unsweetened chocolate (1 oz works well, sweetened chocolate seems to make this gritty) or just vanilla.


Once in the fridge, this firms up like fudge. Such that my daughter calls this "butter-fudge!" And I'm quite happy to make it a bedtime snack. On GAPS intro, we use this a blood sugar stabilizer - I figure it's just a step up from the honey-butter Dr. NCM mentions.

It also comes in handy for icing cupcakes, but admit it, you like to lick icing out of the tub anyway.


Sunday, July 28, 2013

It's a birthday (with honey-free buttercream)


Every birthday and event I like to try more things that I can possibly succeed at. Do all of my grand schemes work? Certainly not. However, something always works out, and fun is had, and every so often something amazing happens. Such as honey-free buttercream. Or the perfect pink icing on the cake. Or her smile while everyone sings the long-anticipated song. Yes, my photography was terrible and my flowers completely flopped; no one said that everything had to pinterest worthy. I think I'm more sad at being so successful with my low-oxalate pulled pork recipe that all the guests ate it and there was nothing left!


So ignore the fact that my buttercream was taken out of the fridge, and hastily put on the fun-fetti cupcake for this photo. It is still chunky, because it is real buttercream, and needs to sit out and soften at room temp (and possibly be re-whipped a little bit) before slathering with abandon on cupcakes.

Yes, yes, I know. You're wondering how I have such fantastic looking fun-fetti cupcakes. I'll tell my secrets, don't worry.

First you have to see 
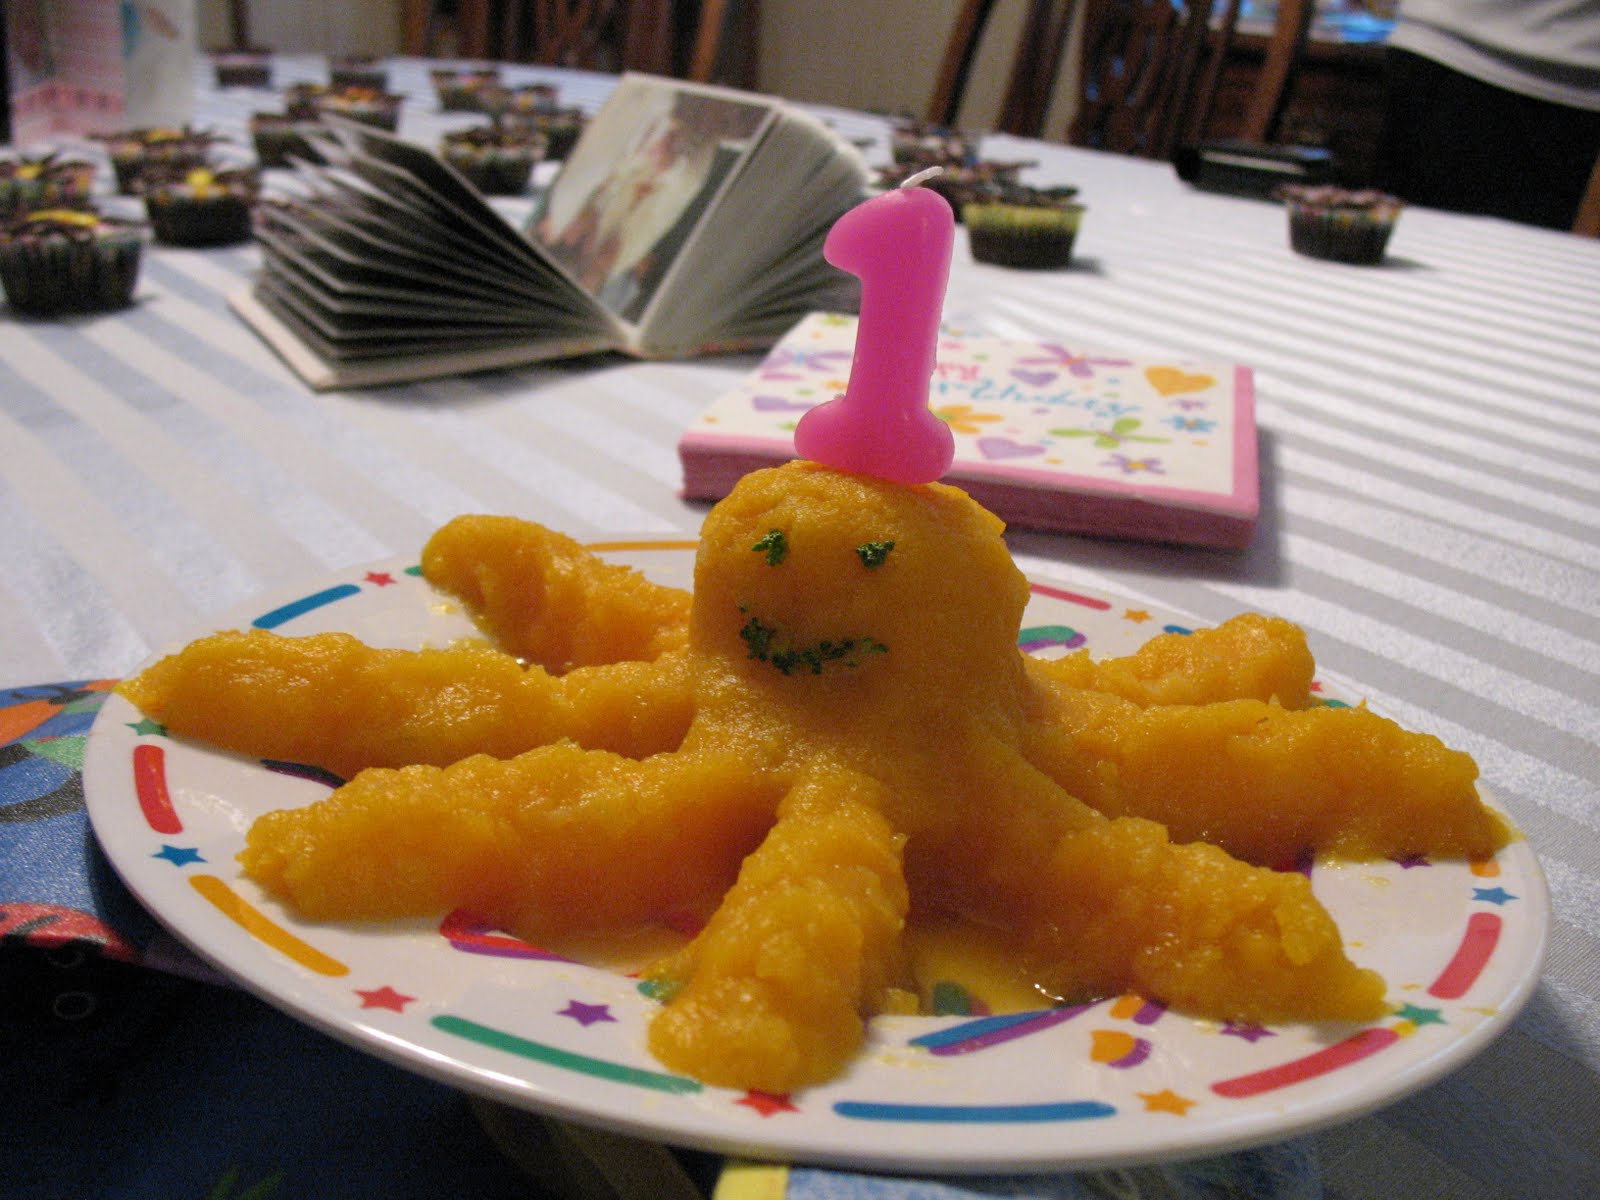
the faux carrot cake again. Yum. This was eaten with delight, even if it did taste like squash.


There are apple chunks in it too. Because apples are delicious.

And have you ever discovered the delight of dying things with beets? I grated a beat, squeezed the shavings through a cheese cloth, and had a super-concentrated pink dye. Really, a few drops transformed mostly white cream cheese frosting into pink amazingness. Did you notice that the pink fades from dark pink to light pink at the top? Very fancy. It would have been fancier as roses, but that was not meant to be.

And the leftover shavings of beet made a boring old yellow cupcake more exciting. Along with the zucchini shavings.

Zucchini and beets in cupcakes? Yes, I've been doing the GAPS diet for too long. I'll have you know, some non-gapsters liked these.

Oh buttercream. I only really knew about so-called buttercreams, people even dare to call them real, but if you're not talking about silky emulsified butter deliciousness, then it's not the same thing. I still love the classic cream and powdered sugar concoction. It has a nice flake when it dries some and is excellent for decorating. But real buttercream? Wow. It makes me want to learn how to make really good cakes just so I can properly compliment it.

My downfall with so many of these delightful sugar-free recipes has been the use of boiled honey. Whether or no it actually turns honey into toxic substance, I don't know. I just hate the flavor and get a migraine from it, and that is enough for me to avoid it! So applejuice is my willing substitute for the liquid, and it works wonderfully. God has blessed us with new foods and new inspiration. I just sat back and thought, if I can emulsify magnesium "oil" and fats to make magnesium lotion then surely I can emulsify any liquid with a fat right? All I need is the technique.

Before you make any attempts to follow this deceivingly simple recipe, read ALL the instructions given by this other gracious blogger here. Read the comments too. Then read the whole recipe again. I thought this had flopped several times, then I re-read her comments and had success!

And here are my substitutions for said recipe:
  • 1/2 c concentrated apple juice syrup (1 c juice simmered until reduced by half)
  • 2 eggs
  • 1 cup (8 ounces) butter  (Use salted for a salty sweet buttercream, or unsalted for a purely sweet. We liked the salted a lot. )
  • 1/16th tsp stevia powder (I'm still using nu-naturals brand, even though it is processed stuff, this is equivalent to around 1/2 c sugar)
  • splash vanilla (opt.)

The apple juice gives a subtle delicious overtone of sour-sweet fall flavor, without most people putting their finger on what it is and simply asking for more.

To make, gently simmer apple juice until the volume is reduced by half. This took some time, but I did the day before while I was cooking other things. Then measure out a half cup and have it ready to bring to a boil.

 I mixed the stevia powder and vanilla with the eggs, and beat until very very frothy. It seems like a very long time to beat for just two eggs, but keep going. Continue beating right up to the moment the apple juice is boiling and ready to add in. Pour it down the side of the bowl slowly while beating.

If you goof (as I did) and the whole concoction is too thin after adding the apple juice, put the (metal!) bowl over the pot with a little water in it, and continue beating as you heat every thing up. The eggs need to cook into marshmallowness before adding the butter.

Then add the butter (when everything is the same temp!)  a little at a time and beat until you have a smooth delicate icing. Spread on ready cupcakes that cooled earlier, or just eat it off the spoon.

And when you're guests compliment you on such delectable icing, bow gently and tell them it is honey and sugar free. 


Monday, March 11, 2013

Eating the Easter Bunny - Baked Meringue, also known as Pavlova


Doesn't everyone eat the Easter bunny on Easter?

This was my DD's special treat last year called Pavlova. It is basically just meringue, though standard recipes have cream of tarter.

Ingredients:
Egg whites (without a speck of yolk!) I usually wait until I have about 2 cups worth.
sweetness - such as a pinch of stevia, or honey.
salt and vanilla if desired.

Just beat egg whites until soft peaks form, and then pour on parchment paper and bake at 250 for an hour, and cool completely in the oven for a few hours or overnight. Yum!  Don't crack the oven after you turn it off, as it needs to continue cooking some.

If you keep it in a sealed container, it will become more soft and sticky, but if it has air, it will be very dry and crispy and make an wonderful mess when you crunch a bite of it.

I'm not sure how long it keeps, though I've had it on the counter for as long as a week, but usually we inhale it still warm. You can make it really fancy by topping with whip cream and berries, or chocolate pudding and bananas.... the list goes on. What doesn't go well with sweet crispy air?

For more treat ideas that don't involve mountains of sugar, check out this link: Easter without the Junk!


Friday, February 8, 2013

Belated Birthday Post

 Perhaps I should label this an "un-birthday" post - every day is your un-birthday, so you are never late!

However late this post is, we did celebrate my daughter's birthday on time, and it was great fun. We had a beautiful butterfly theme decorating the house.


She loves butterflies.

She tolerates oranges, lemons, and limes fairly well, so we transformed those into a delicious birthday "cake" for her.  The lemon juice gave the jello great color too.


And did you know you can turn oranges into butterflies?


They looked really cute around her cake.


We dressed up the cucumbers as well.


And before you think I'm super talented, just do a little googling. It's easy to have fun with a few foods.

Wednesday, December 19, 2012

Real Food Room Temp Fudge


I have to admit I've really suffered trying to perfect this recipe for you ;) It did take quite a few iterations to perfect it.

Now, there are tons of real food recipes for fudge out there. And while incredibly delicious, they soften a lot at room temperature, and don't hold their shape if left out too long. Your fingers require a lot of licking too, which isn't a bad thing... but doesn't bode well for putting in little wrappers and serving at high class parties.  I also felt they didn't have quite the right chewey-ness that fudge excites in one's mind. The ones that do hold their shape and texture use lots of sugar and well-cooked milk too, but I wanted one that left the dairy more raw, and kept the texture without the sugar content.

So I'll let you in on my discovery....

Gelatin!

I've been incorporating gelatin into my diet in many ways these days, and having a lot of fun with it (as you can see from past posts!) Only recently however did I consider that it might be just the remedy that real food fudge needs to brave the test of sitting out all during a long dinner until the guests saunter over to the dessert table.

So without further ado, here is my recipe:


4 oz unsweetened chocolate
1 c cream (heavy whipping cream would be fine, I used what we skim off our milk. You can use thinner "milk" too, I used plain milk instead of cream, and it came out ok, though not as rich, so I'm sure dairy-free subs such as coconut cream will work fine!)
1/8 tsp stevia &   (I'm using NuNaturals extract powder, you sugar sub may be different)
2 TBS honey      .... equiv. to approximately 1.5 C sugar or 3/4 c honey
pinch salt
swig vanilla
 2 TBS gelatin (I used Great Lakes brand, if using packets, then you need 2, Bernard Jensen brand was too chunky)


Before you get started, you will need a small pot, and two stainless steel bowls that fit over it to make a double boiler. If you don’t have two bowls that size, then you can do the cream mixture in a small pot. Just use very low heat! Put the gelatin into a small dish so it is ready for the critical moment.

In a double boiler, melt chocolate over low heat.

Meanwhile, in another stainless bowl (or small pot), mix cream, sweeteners, salt, and vanilla. Whisk really well to get it as smooth as possible.

Check on the chocolate often to make sure it doesn’t melt too quickly, and gently stir occasionally. Once all the chocolate is completely melted and smooth, remove the bowl from heat. Do not turn the fire off under the pot.  Put the bowl with the cream mixture onto the pot of water, and whisk while it heats. (Or heat the cream mixture in the pot on very very low heat.)

During this time the chocolate has had a chance to cool a little bit. Do not try to save time by heating both mixtures at the same time! Adding liquids too quickly to melted chocolate will cause it to seize.


While the cream mixture is heating, whisk constantly, once completely smooth, immediately remove from heat and start mixing into the chocolate. You want it warm, but not so hot that you can't keep your finger in it for 10 seconds. Whisk the chocolate while pouring the cream mixture in slowly. It will thicken and act as though it won’t mix well, but don’t worry! Just keep stirring. You may need someone to either hold the bowl or pour the cream mixture for you!

Once mostly combined, get the gelatin. Sprinkly it around evenly while you incorporate it into the fudge, whisking. It will get a little bit chunky and not completely dissolve. Perfect! If it dissolves too much, then you have too chewey fudge, if it dissolves too little, then you have large chunks of gelatin. The slight warmth of the cream and chocolate dissolves the gelatin a little, and the careful addition of it (sprinkle in a circle motion while whisking) incorporates it magically.

Transfer to a dish to cool. No need to line with anything, it should come out pretty easily.

Should be completely cooled in the fridge in a few hours. And it actually tastes best at room temp!

After cooling, cut into squares, and try not to eat them all yourself!

~*~*~*~*~*~*~

Also, as far as I know, this is a completely original recipe. I haven't made the typical fudge recipes with sweetened condensed milk, but I realize now that this is what I'm emulating. So if you think my method is amazing, please don't copy it, give credit where it's due. Thanks!


Monday, September 24, 2012

Cucumber Pops!

Summer is winding down here, but one of summer discoveries was the delight of cucumber pops!

I got these awesome silicone popsicle molds (that have lids for no spillage!) and because of their design, you can squeeze up the frozen goodness.

All you do is peel a cucumber, and put in the food processor. I suppose you could go through the effort to remove the seeds, but I didn't bother. Run the processor for a minute or so, it will all turn to liquid! Then pour into your mold (don't fill to the brim, they expand during freezing) and freeze until solid.

It would probably be even tastier with a pinch of salt, or maybe some fresh mint leaves. Mmm... But even plain, these were a great treat.


Friday, July 13, 2012

Lemon-Lime Jigglers

3/4c lemon and lime juice
5 c filtered water, divided
2.5 Tbsp honey
5 Tbsp gelatin
1 tsp lemon extract, if desired


Put half the water in a small pot to heat while you squeeze lemons and limes. Filter pulp if desired, or leave with juice.
Put juice, honey, and gelatin in the bowl.
Add hot water (steaming, not boiling is fine) to the bowl and whisk well until all the gelatin is dissolved.
Then add the rest of water and let it sit in the fridge until firm.

(Just don't put a hot glass in the fridge right away!)

When fully set, cute into cubes and enjoy!


~~~


I taste the unfinished jello to make sure it is very flavorful, if I don't have enough juice I'll add a little lemon extract. You can also use less honey for a tangier result.
Use less gelatin (only 3 TSBP) for a softer set jello. This recipe makes jigglers!

Tuesday, February 14, 2012

GAPS Gummis!

Beginning of pregnancy I really wanted cinnamon gummi bears. I wish I knew why... but they sounded amazing. Not until later when I figured out how to make homemade Jello did I even venture to ask if I could make my own gummi candies.

Turns out you can!

Now - you could use fruit juice (probably concentrated) or various other things... but my DD is off most fruit, and cinnamon was my craving. So experiment! Be inspired! Get a mold and make your own GAPS gummi worms!!!

 For now, here is my recipe for gummi cinnamon sticks:

1/2 c water
1.5  Tbsps bernard jensens gelatin
a generous amount of cinnamon (about a half tsp)
big drizzle honey (or small one, if you like less sweet)


Whisk thoroughly, heat till steaming (will heat very quickly!) and make sure everything is well mixed and dissolved.
Pour into dish and toss in freezer or fridge till sufficiently solidified. (An hour or so in the freezer, for this small amount)
Then cut into strips!!!!

Of course, if you have a mold, you can make these really pretty. Cooling it quickly seems to help the cinnamon from sinking to the bottom. 

She doesn't care what shape they are - they taste yummy!

Now, as to how to clean the pot..... I may whisk my ingredients in my mold in the future. The pot took a lot of soaking!

Monday, January 30, 2012

Jello Tea

Sometimes the longing for fruit becomes very difficult. Or even Jello. With all its sugar fake flavor goodness. It's delightful jigglyness and mouth feel..

Wait... you mean I can’t have jello anymore because I’m trying to avoid sugar or can’t have fruit?

Noooooo!

As I was doing ok with fruit flavored teas, which nicely help to tone the flavor of my more bitter ones (nettle and dandelion anyone?) I suddenly was struck with the question: Can I make tea into jello? Well, yes, you can! So in desperation for something fruit like... I bought some cheap gelatin and mixed it with one of my favorite fruit teas... and it was wonderful.

Amidst my searching for an answer to this question, I discovered Bernard Jensen Gelatin. Hurray! Gelatin I can be really happy about. It is made from good animal gelatin and doesn't have weird additives or crazy processing methods. It seems I have to use slightly more than commercial gelatin to do the job, but I just keep that in mind if converting recipes. There is another excellent quality brand of gelatin out there, but I can't recall the name.

Just a note about this recipe - this makes very lightly sweetened jello. My daughter and I love it, but we've gotten used to non-sweet things. Sometimes I don't use sweetening at all. Just think of it as your favorite tea now cold and jiggly.

In fact, I found out that there are many traditional recipes for non-sweet jellos! Meat flavored herby gelatin sounds a little strange to my over-sugared American ears still... but I really should try them sometime. Like this jellied chicken recipe...

Then again, maybe I'll stick to herbal teas and fruit....

For every 1 cup of liquid, it’s a 1/2 Tbsp gelatin. I like to go a little over that (think heaping Tbsps) to make it extra firm.

2 cups filtered water
tea of your choice
small drizzle honey (about 2 tsps maybe) If desired.
2 heaping TBSP gelatin
a good whisk

Brew your tea as usual, and compost the tea bag or herbs. If the tea is still very hot, just pour into the dish you'll make your jello in, along with the gelatin and honey and whisk thoroughly. If you are doing an infusion or decoction and the tea is too cool for the gelatin to dissolve, then gently re-heat it first.

Once everything is whisked thoroughly, and the gelatin is completely dissolved, you're done! Throw it in the freezer for an hour or two for quick setting, followed by some time in the fridge,  or in the fridge for several hours for a slower set.

Just be sure you don't put a super hot glass in the fridge or freezer! This is one area where I've compromised and used a plastic bowl - I just don't have a stainless steel one that would work well.


And voila... you have Jello!!!!!

Oh, and another note:  if you dip repeatedly into the dish in the fridge, the saliva will begin to break the jello down (oops.) You can just use that as an excuse to eat it faster.

Wednesday, June 22, 2011

Banana leather

Walked into the store and they were begging me to take away bags upon bags of spotted bananas. Bananas are one fruit I don't feel quite as bad about buying conventional, as the thick skins that absorb the chemicals and pesticides are peeled away, but if I could get everything organic, I would get organic bananas too, at least for the sake of the growers. Walking out of the store with two huge bags of spotty bananas was a treat I didn't want to pass up, even if I'm not making banana bread. So home they came.

My daughter helped mash them as I peeled and drop them into the bowl.

Then I spread them on a piece of parchment paper, laid on a pan, and put them in my 200 degree oven for several hours. I was drying several other things in the oven anyway.

At that point, they had browned some and looked lovely, but weren't dry enough. So down into the dehydrator at 135º overnight.


And in the morning I had this:


Chewy, densely sweet, and ready and waiting should I want to add to smoothies or baked treats (as a sweetener!) or just for a banana-y treat. 

Friday, March 4, 2011

Pastelli Candy


Candy on GAPS???? Yes!

This is a recipe from Nourished Kitchen. For the recipe go here.

I ended up adding a full tsp of salt, and used coconut ghee instead of olive oil. Chewy and sweet and so good!

Thursday, November 4, 2010

Key Lime Pie (cheesecake!)

This is so simple and delicious. Definitely for those who like limey & tangy. (Which does not include my mom - but does include one of my brothers!)

Crust:
3/4 c pecans
3/4 c almond flour
1 egg
2 T lard
2 tsp honey
1/4 tsp salt
vanilla (opt.)
1/4 tsp nutmeg

Puree pecans in food processor (if almonds are whole, grind those first) then add rest of ingredients. bake at 325º for 15-20 minutes. Allow to cool completely before adding filling.

Filling:
4 c tangy yogurt, strained overnight (Should yield 2 cups cream cheese)
juice from 1&1/2 limes, plus rind for extra limey-ness
1/2 c heavy cream, optional
1/4 tsp vanilla, optional
1/2 c honey
1/4 tsp pure stevia extract powder (or an additional 1/2 c honey)
(You may like it sweeter, I enjoy the tanginess.)

Beat all ingredients aside from cream, taste for your preference. If you want a fluffier result, beat cream with electric mixer until you have firm peaks, and then gently fold into lime mixture. Spread into cooled crust and put in freezer for a few hours until firm.

(Alternatively, you can make the day before and leave in freezer overnight, and just put it in the fridge to soften a couple hours before serving.)

Thanks to GrainFreeFoodie for getting me started on the crust!

Friday, August 27, 2010

Lemon ice

Oh.. happy accident. I was trying to make the lemon curd... and I didn't cook it long enough, and skipped straining so it was a little too thin even after going in the fridge. I also think I added too much lemon juice. But I had some frozen yogurt in the freezer, so I dumped it in and stirred it up. Oh... lemony goodness!

Lemon Ice


4 egg yolks
juice of 1 large lemon or two small lemons
1/4 c honey
1/4 c coconut oil/butter/palm shortening

3 cups tangy yogurt
3 tbs honey
little vanilla

Mix up the first four ingredients, and put in double boiler (bowl on top of small pot with a little water in pot.) Whisk quickly while it thickens somewhat. Once it blends well and starts to bubble a little, it's done! Take it off, and allow it too cool.

Now, there are two ways to do this - you can freeze the yogurt and swirl in the lemon, or you can mix it all up and then freeze it. Personally, I like the lemon swirl, but it is up to your preference.

Mix the yogurt with the honey and little vanilla and pour into ice cream maker and freeze according to manufacturer's instructions. Once frozen to the point of soft serve, add lemon egg mixture and continue stirring and freezing. Transfer to freezer to firm up, and serve.

If you wanna be really fancy, pull out a (well-ripened for GAPS) banana and slice it up. Lemon and banana - yum!

Thursday, August 19, 2010

Best Ever Grain Free Brownies!

It's taken a lot of experimentation, but I finally have a grain free brownie recipe that I'm happy with. I tried the bean recipe, I tried avacado, coconut flour, almond flour... and finally came back to squash. I tried different amounts of butter and cocoa and decided pecans with chocolate is divine. When I do bring back grains, I think I'll just sub them out for the squash. It is that good. I think I like it even better cold. It kept us very happy while we were on vacation!

(Note: Cocoa is technically not GAPS legal, but I'm allowing it to keep sane, and I don't think it hurts my progress too much. Everything else is GAPS legal.)

Ingredients:
1 c pecan butter (put crispy pecans in processor till they turn to butter.)
1/2 c overcooked, mashed butternut squash - could increase to 1 cup for more volume
4 eggs - increase for more cakey brownies
1 1/2 tsp vanilla extract (make sure no corn syrup or additives)
1/2 tsp salt
1 c cocoa
1/2 c palm shorting/ coconut oil/ butter (butter would give a richer flavor)
1/4 c honey & 1/8 tsp (scant!) stevia    OR 1/2 c honey (taste to see if it needs more)

Soften your fat and add other wet ingredients. Mix everything aside from cocoa thoroughly and preheat oven to 350º. Fold cocoa in gently until completely mixed in, but do not overmix. Pour into well greased 8x8 or 9x9 pan and bake for 30 minutes. Wait until cool before cutting into, if you can manage!

These are rich, soft, and dense. I'd like to try using some unsweetened chocolate instead of the some of the cocoa. The conversion is 3 T. cocoa powder and 1 T. butter for 1 ounce of unsweetened baking chocolate, so I would use 3 oz. unsweetened chocolate and lessen the cocoa to 3/5 cup, and the fat to 1 heaping tablespoon.

Many thanks to all those who inspired me with their recipes!

Shared on Pennywise Platter Thursday 8/19.

Tuesday, July 20, 2010

Octopus Squash Birthday Cake

My baby is one! I made chocolate bean cupcakes for everyone else, but for my highly sensitive baby, I wanted to make her a cake she could squish, cover herself in, and eat without any reactions. So far homemade yogurt, mashed avacado, pre-chewed meat, and butternut squash are happy foods for her. So I cooked up a squash until it was nice and mushy, and squished and squashed and molded it into an adorable little octopus. Little bits of broccoli made the face, and my baby had a marvelous time.

Tuesday, June 29, 2010

Cashew Cookies

Just the thing to eat when you want a treat and... err. There are no cookies in the house anymore. These are soft, chewy, and wonderful, without being cakey. And so yummy.

3 c finely ground cashews/cashew butter
2 eggs
1/2 c honey

Blend cashews in a food processor as long as you can stand. The smoother they are, the better the cookies. Transfer to a bowl and mix in eggs and honey. Batter will be soupy/gloppy. A little time in the fridge helps. Drop in gloppy spoonfuls onto greased cookie sheet and bake at 350º for 10-12 minutes. They will spread, fluff up, and finally turn golden brown. Allow to cool on the pan before transfering to a cooling rack. Or your mouth. Makes 2 dozen large cookies, or 3 dozen smaller ones.

idea from: Premeditated Leftovers

Notes: I could easily see this working with 1 egg per two cups cashews. You could also use less honey if you like since cashews are naturally sweet.

I'm anxious to try this with other nuts when they come in. Mmm....

Wednesday, June 23, 2010

Homemade Nutella for Father's Day

Daddy loooooves Nutella. So do I. And I have a brand new 525 watt food processor.

Homemade Nutella
(Modified from http://www.sugoodsweets.com/blog/2005/12/nutella/)

  • 1/2 cup honey
  • 
1/4 cup raw milk 
  • 
2 cups whole raw hazelnuts (soaked for 8-24hr in salt water)
  • 2 oz. unsweetened chocolate

  • 1/2 tsp vanilla extract

  • 1/8 tsp salt
    1.    Preheat oven to 350 degrees F. Place hazelnuts in a single layer on a shallow baking pan. Toast until the skins are almost black and the meat is dark brown, about 25 minutes. Stir the nuts halfway through baking to ensure an even color.
    2.    Since the skin is bitter, you’ll want to discard them. Wrap the cooled hazelnuts in a clean kitchen towel or paper towel, and rub until most of the skins have come off. Don’t fret if you can’t get off all the skins.
    3.    Process nuts in a food processor, scraping down the sides of the bowl occasionally, until they have liquefied, about 5 minutes. First, you will get coarsely chopped nuts, then a fine meal. After a little while, the nuts will form a ball around the blade, and it will seem like you only have a solid mass. Keep processing. The heat and friction will extract the natural oils, and you will get hazelnut butter!
    4.   Melt chocolate with honey in a double boiler, (see picture) stir while melting, and then remove from heat. Add liquefied nuts, and rest of ingredients, and whisk vigorously.
    5.    Transfer the spread to an airtight container, and store in the refrigerator for 1-2 months. For best results, stir the chocolate-hazelnut spread before using.

Additional notes:
I used half as much honey and thought it quite good, but I like pretty bitter chocolate. Hubby thought the flavor was perfect. 
Could possibly use some more milk/butter, as it was fairly firm even when room temperature. 
The nuts really do liquefy. I stopped the processor, thinking they were done, but decided to process more, and could have done more than that. 

Now cook up some pastured bacon, some super thin GAPS legal crepes (just egg and little water), and pull out some blueberries.

Happy Father's day!

(shared on Fight Back Friday)

Peanut Butter Brownies

Dessert! Dessert! Helping to chase those cravings away....

PEANUT BUTTER SQUASH BROWNIES
by Nancy

1 cup peanut butter
1/4 cup honey
1/2 teaspoon baking soda
1 egg
1/2 cup cooked butternut squash (overcooked is best)

Mash squash, add rest of ingredients and mix thoroughly. A double batch will make thick brownies in a 9x9 pan, or you can do thinner brownies (single batch) in an 8x8.
Bake at 350 for 25-30 minutes.


 Credit where credit is due: http://sanjayamma.blogspot.com/2007/11/peanut-butter-squash-brownies.html
(I use less honey - more PB flavor)


(And no, there is no chocolate in these, but it certainly wouldn't be bad with some!)
Related Posts with Thumbnails